Login with Facebook
Showing posts with label Installation Guide. Show all posts

Saturday, June 26, 2010

Import Configuration from NNMi 8.X to 9.x : Part 1

In this article I am just giving example of on of the configuration setting that can be exported from NNMi 8.x to NNMi 9.x
Node Groups “nodegroup.xml” file contains nodegroup information in XML format, in NNMi 9.x there one more attribute is needed in the xml file which is not part of the export details
<ns2:calculateStatus>true</ns2:calculateStatus>
Open in Wordpad nodegroup.xml
From edit menu –> replace
in find what <ns2:additionalNodes/>  and in replace with write <ns2:additionalNodes/> <ns2:calculateStatus>true</ns2:calculateStatus>
SNAG-0030

Note: I have used find and replace (as stated above "to search for and to replace it with the same tag plus the line needed" )to make it easy in adding the tag as bere the example below I have highlighted this line just to clarify that this is the only addition needed.
<ns2:nodeGroup>
            <ns2:addToPerfSPIReports>true</ns2:addToPerfSPIReports>
            <ns2:addToViewFilterList>true</ns2:addToViewFilterList>
            <ns2:additionalNodes/> <ns2:calculateStatus>false</ns2:calculateStatus>             <ns2:children/>
            <ns2:filterExpressions/>
            <ns2:name>APC (American Power Conversion)</ns2:name>
            <ns2:nodeDeviceFilters>
                <ns2:item>
                    <ex:ref>
                        <ex:key>40e2ab16-e401-492f-88e0-88f81cb0c6c9</ex:key>
                        <ex:type>com.hp.ov.nms.monitoring.groups.model.NodeDeviceFilter</ex:type>
                    </ex:ref>
                </ns2:item>
            </ns2:nodeDeviceFilters>
            <ns2:parents/>
            <ns2:type>USER</ns2:type>
            <ns2:uuid>74e4ddba-9e82-4e91-a660-9b8f6fe4c267</ns2:uuid>
        </ns2:nodeGroup>
nnmconfigimport.ovpl -u system -p password -f nodegroup.xml

Saturday, February 6, 2010

Install HP Performance Manager license

To install license to OVPM you can use the steps below

cd %ovinstalldir%\bin

ovpm license

image

a new text window is open for controlling license and you will get message like license expired

type gui to launch Autopass for OVPM

Select Install/restore License

Click Browse to locate the license file

Click view content

Click Install

image

Close the application

in the text program type status to get the current status.

image

now you can log to system normally

Saturday, October 3, 2009

How to install SiteScope 10 License

  1. Stop Sitescope service
  2. Look for the following lines and check their values in master.config located in <sitescope dir>\groups (in Sitescope 10 they should be correct):
  3. _doWorkWithConfigFilePersistency_current=true
  4. _doWorkWithConfigFilePersistency_next=CHECKED
  5. Change "_license", "_licenseOld" and "_licenseForX" values in master.config using a new valid license key.
  6. Open <sitescope dir>\bin\PersistencyViewer.bat, select persistency folder under sitescope directory and then click open.
  7. Select in the "Filter by type" "com.mercury.sitescope.platform.configmanager.MasterConfig" and double click on "__masterConfig"

image

  1. Change "_license", "_licenseOld" and "_licenseForX" using same value used before, then click commit.
  2. Select in the "Filter by type" "com.mercury.sitescope.platform.configmanager.preferences.PreferencesConfig" and double click on "GeneralDefaultPreferences_"
  3. Change "_license", "_licenseOld" and "_licenseForX" using same value used before, then click commit.
  4. Start Sitescope service.

Tuesday, December 16, 2008

Install HP OM Agent on Windows

to install HPOM Agent formerly known as OVO agent on a Windows machine

you have to copy the source files to your Windows temp location “you can use ftp but be careful against the binary and ASCII files transfer modes for different files”

the files located in the HP OMU server in the following path.

/var/opt/OV/share/databases/OpC/mgd_node/vendor/ms/x86/winnt/A.08.xx.yyy/RPC_BBC/

xx.yyy is the version of the client depend on how your Management server is patched.

insure that there is FTP service is installed and SNMP service configured to answer the management server request about the machine type while you adding the new node

then launch the installation using cscript opc_inst.vbs

On the Management Server

At the same time you can go for adding new node by using the Manage Node Bank then Action --- Node --- Add


image

After the installation if you did not configure configuration file for the server information, you can use opcactivate.vbs to do the following.

image

C:\ms\x86\winnt\A.08.10.160\RPC_BBC>cscript "C:\Program Files\HP OpenView\\bin\OpC\install\opcactivate.vbs" -srv ia64-13 -cert_srv ia64-13
Microsoft (R) Windows Script Host Version 5.7
Copyright (C) Microsoft Corporation. All rights reserved.

opcactivate Info: OVO activation script starting ...
opcactivate Info: Setting MANAGER to user supplied value ia64-13
opcactivate Info: Getting core ID of OVO system ia64-13 ...
opcactivate Info: Pinging OVO system ia64-13 using BBC ...
opcactivate Info: Successfully pinged OVO system ia64-13. Parsing results file out.out ...
opcactivate Info: Core ID of OVO system ia64-13 is 1bbd1b10-eb84-7535-1e49-a630571e5970
opcactivate Info: Setting CERTIFICATE_SERVER to user supplied value ia64-13
opcactivate Warning: Not registering opcauth.dll. Passwordless switch-user operations for OVO actions will not be possible.
opcactivate Info: Not disabling remote trace access.
opcactivate Info: Killing OV services ...
opcactivate Info: Killed OV services.
opcactivate Info: Starting OVO agent ...
opcactivate Info: Successfully started OVO agent.
opcactivate Info: Successfully activated OVO agent.

C:\ms\x86\winnt\A.08.10.160\RPC_BBC>


On the OVO server

to insure communcation for your new client you have to make the server trust the client certificate

so Select Action – Nodes --- OVO Node Certificate Requests

image


Select the node from the Managed Nodes Bank then click on Map to Selected Node
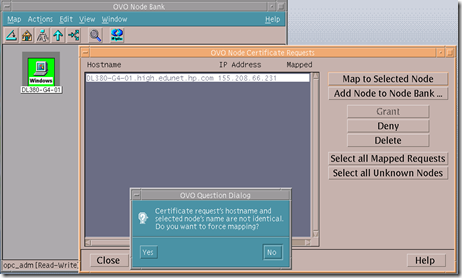
image

After successful mapping select Grant

note: you will get this error message if your are not configuring DNS or HOSTs file correctly