Login with Facebook
Showing posts with label Powershell. Show all posts

Friday, February 5, 2010

How to use WBEMTEST to get WMI data level 1

Launch wbemtest from command prompet or RUN

image

Here is the interface

image

to locate WMI classes attributes or instances you have to connect with account with sufficient privilege (note: all users has privilege to WMI but depend of type of action you want to execute which may require administrator priv.)

press on connect then type which namespace you want to connect to: by default Windows (Win32_*)built-in classes almost located under root\cimv2 then click connect.

This will connect you with the current user account, you may specify another account to gain more privilege

image

This is the screen after connection.

image

If you know certain class you can click on Open Class

If you do not know and you want to search manually you may click Enum Classes

To get all the classes you may select Recursive and press OK

image

A full list of classes will be displayed as below

image

Browse to any class and double click

for example User Account on the local machine are under Win32_UserAccount class

 image

Click on Instances to list all the instances

image

Here is the list of User Account

image


To be continued.

please remind me to continue it.

Wednesday, November 18, 2009

Allow OVPI to send emails through Exchange 2007

Remember one thing that there is two tasks you should do

1- create Receive Connector to accept OVPI connection

2-PowerShell Command to assign Permission for anonymous to relay from OVPI

To troubleshoot this  Create dummy schedule and run the reports inside and you can open %dpipe_home%\log\piweb.log

If you got  Unable to relay

image

To use the Exchange Management Console to create a new Receive connector that grants the relay permission to anonymous connections

  1. Open the Exchange Management Console. Perform one of the following steps:

    1. To create a Receive connector on a computer that has the Edge Transport server role installed, select Edge Transport, and then in the work pane, click the Receive Connectors tab.
    2. To create a Receive connector on a Hub Transport server role, in the console tree, expand Server Configuration, and select Hub Transport. In the result pane, select the server on which you want to create the connector, and then click the Receive Connectors tab.
  2. In the action pane, click New Receive Connector. The New SMTP Receive Connector wizard starts.

  3. On the Introduction page, follow these steps:

    1. In the Name: field, type a meaningful name for this connector. This name is used to identify the connector.
    2. In the Select the intended use for this connector: field, select Custom.
    3. Click Next.
  4. On the Local network settings page, follow these steps:

    1. Select the existing All Available entry, and then click Remove icon.
    2. Click Add. In the Add Receive Connector Binding dialog box, select Specify an IP address. Type an IP address that is assigned to a network adapter on the local server that is best able to communicate with the remote messaging server.

Note: In simple exchange implementation, you can leave it as default.

    1. On the Local network settings page, in the Port field, type 25, and then click OK.
    2. Click Next.
  1. On the Remote Network settings page, follow these steps:

    1. Select the existing 0.0.0.0 - 255.255.255.255 entry, and then click Remove icon.
    2. Click Add or the drop-down arrow located next to Add and type the IP address or IP address range for the remote messaging server or servers that are allowed to relay mail on this server. When you are finished entering the IP addresses, click OK.
    3. Click Next.
  2. On the New Connector page, review the configuration summary for the connector. If you want to modify the settings, click Back. To create the Receive connector by using the settings in the configuration summary, click New.

  3. On the Completion page, click Finish.

In the work pane, select the Receive connector that you created.

  • Under the name of the Receive connector in the action pane, click Properties to open the Properties page.

  • Click the Permission Groups tab. Select Anonymous users.

  • Click OK to save your changes and exit the Properties page

Open the Exchange Management Shell.

  • Run the following command using the name of the Receive connector that you created in steps 1 through 11:

    Get-ReceiveConnector "Receive Connector Name" | Add-ADPermission -User "NT AUTHORITY\ANONYMOUS LOGON" -ExtendedRights "Ms-Exch-SMTP-Accept-Any-Recipient"


image 


to list the Receive Connector Name you can type Get-ReceiveConnector

Friday, May 15, 2009

Uninstall Products using Powershell

I am trying to uninstall a product I have recently added to my Windows and i tried to access the normal way of uninstallation

which you can go Control Panel\Programs\Programs and Features

image

The problem is that the product I am trying to uninstall is not displayed there, although the product is available in the start menu

image

So I will use Powershell and WMI to uninstall it

gwmi win32_product

image

gwmi win32_product -filter "name='HP ProtectTools Security Manager'"

image

now I will try to find what is the available methods that we can use with this class

I can write gwmi win32_product -filter "name='HP ProtectTools Security Manager'" |gm or gwmi win32_product |gm

image

to call a method you have attach your command to a variable then call the varable.method()

to attach it to variable type $varname=the command

$product=gwmi win32_product -filter "name='HP ProtectTools Security Manager'"

Now we can attach Uninstall method to the variable

$product.uninstall()

this should work fine but as I am tring this example on Windows 7 it gave me return value of 1603 it means some thing that is not 0 (normal exit)

image

I investigated the problem and I found as usual the application is running under non elevated privilege I should select Run as Administrator.

image

I did so and I tried the command again and it gave me return value of Zero.

image

Article Code

1 $product=get-wmiobject win32_product -filter "Vendor='Hewlett-Packard'"
2 $product.uninstall()

Saturday, May 2, 2009

1- What is WMI?

As, I promised I will try to give you a solid background about Windows Management Instrumentation WMI.

I will write multiple articles with the name of What is WMI. I will start by start by Microsoft Management Console ending by WS-management in Windows server 2008 and its R2

In this article I will tell you mainly about today’s Microsoft Management Technology like Powershell and WMI, but this will be later in this topic.

Early Microsoft Management Technologies:

I will first describe Microsoft strategies in Management, I will start in late January 1998 when Microsoft released Microsoft Management Console (MMC) where it is a main Console and the developers create their applications as a part of the console or what we name is a snap-in, I think MS main concern is to facilitate administration interfaces and to combine them into one interface, and MS introduced IIS version 4 as a part of  Microsoft Windows NT 4 Option Pack to be Full MMC complaint application and to contain all the snap-ins for (web service and FTP and other components)

If you remember when we were using Windows NT 4 administrative tools, where the way to access the application manu  is inconsistent where you fine the menu is file, edit, view and for other application is user, view, tools and so on

Microsoft Management strategies in those old days was wonderful where you unify management in a single console with context menus.

U6 ntsvtl11  
User Manager for Domain- the main Domain users and group management Server Manager – Used to manage computer accounts
Services application – for start and stop  system services
 

Win2kDefrag In windows Server 2000 Microsoft released MMC version 1.2 where is supports group policy management and user account snap-ins plus other features you may fine in Wikipedia.


You can fine Microsoft definition for MMC in MSDN

The Microsoft® Management Console (MMC) component is a framework for administering Microsoft Windows®-based environments. MMC provides a simple, consistent, and integrated administration user interface and administration model.

You can use MMC to create, save, and open administrative tools, called consoles, which manage the hardware, software, and network components of your Windows system. If an application uses MMC to host its management tasks, then the application provides a console with snap-ins, which are dynamic-link libraries (DLLs). Event Viewer is an example of an application using the MMC framework in this way.

ntsvtl07 Bb742446_event_viewer(en-us,TechNet_10)
Event Viewer in Windows NT 4 Event Viewer in Windows 2003 / XP

Step-by-Step Guide to the Microsoft Management Console

In Microsoft April 2003 release Windows Server 2003 which incloded with MMC version 2.

in Microsoft released Windows 2003 R2 which supports natively MMC version 3, the two main features are A new pane called the actions pane is available; It displays available commands for the selected node and Functionally rich views can be created using one of the four available view types: list, Windows Forms, HTML, and message like below System Center Configuration Manager 2007 SCOM summary web pages inside the console.

image

see you next article.

Thursday, April 16, 2009

Creating Functions in PowerShell

I have told you before in my previous blogs about Hyper-V and PowerShell to play with VHDs using WMI

This requires that every time we need to get VHD info we have to write  the below

$computer = "LocalHost"
$namespace = "root\virtualization"
$disk=Get-WmiObject -class Msvm_ImageManagementService -computername $computer -namespace $namespace

then we have to remember the method name or use get-member commandlet then we can use it like below:

$disk.GetVirtualHardDiskInfo(“c:\vhds\sccom.vhd”)

What I will add today that we can create something like command-let; this is so called functions in PowerShell

It is very easy just type the function name followed by open brackets { then   type your commands in one or more lines then close it by }

Lets create function to give us VHD disk info and lets name it get-diskinfo

function get-diskinfo {
$computer = "LocalHost"
$namespace = "root\virtualization"
$disk=Get-WmiObject -class Msvm_ImageManagementService -computername $computer -namespace $namespace
$disk.GetVirtualHardDiskInfo(“c:\vhds\scom.vhd”)
}

then you just execute the function name like get-diskinfo then it will work seamlessly

image

the problem that we will execute it and every time it will execute against the same disk

we need to use variables or we can name it parameters.

There are variables called $args[0] or $args[1] or $args[2] and so one; these can be used to get parameters when you execute the command so $args[0] is the first parameter then $args[1] is the second parameter and so on.

Then we will add $args[0] after the $disk.GetVirtualHardDiskInfo( like $disk.GetVirtualHardDiskInfo($args[0])

function get-diskinfo {
$computer = "LocalHost"
$namespace = "root\virtualization"
$disk=Get-WmiObject -class Msvm_ImageManagementService -computername $computer -namespace $namespace
$disk.GetVirtualHardDiskInfo($args[0])
}

so we can now type 

get-diskinfo “c:\vhds\scom.vhd”

the final question running into my head; when we close the PowerShell console this function will remain or it will disappear

actually it will disappear so we have to load it everytime the console starts

to do so we have something called profile script which automatically starts every time you run the PowerShell console

to access the your console profile script you can type

notepad $profile

it will open the profile in the notepad almost it will give you error as the file is not created yet

so you can use command like

fsutil file createnew $profile 1

This will create file on this path %Userprofile%\Documents\WindowsPowerShell\Microsoft.PowerShell_profile.ps1

Now, you can edit it and add your functions so you can use it everytime you lunch the PowerShell Console.

image

Thank you for reading and I hope this was usefull.

Monday, April 13, 2009

Reconnect VHD Parent Disk

Dear my readers,

As stated in a previous blog, there is three main types of the disks.

the Child and parent disks where you can have some sort of base disk contains all sysprepped image of the windows and another child disk contains the currently running system like base for windows 2003 sp2 and multiple child disks contains different applications

anyway what I am trying to address is when you move your parent files to another directory and try to open the child VHDs in your VMs you will get a message in Virtual PC saying please locate your Parent disks, but if you are using HyperV you will get error message which says you cannot start the machine due to disk failure….

You can use the WMI to connect back your Child disk with the parent in the new location

we will declare variable for the wmi class we working with.

$vhd=gwmi Msvm_ImageManagementService –namespace root\virtualization –comp $computer

we will define the disks as variables

$child=c:\vhds\child.vhd

$parent=c:\vhds\parent.vhd

we will define the computer we are trying to connect to in the $computer variable; if it localhost we will use “.” dot if it is remote we will use the accessible hostname or netbios name.

$computer=.

now it is ready to use our method ReconnectParentVirtualHardDisk which help us the solve the problem stated above, as we learnt before that if we want to know how to use certain method then we use get-member and look for the syntax in the definition

$vhd |gm ReconnectParentVirtualHardDisk |fl

TypeName   : System.Management.ManagementObject#root\virtualization\Msvm_ImageManagementService
Name       : ReconnectParentVirtualHardDisk
MemberType : Method
Definition : System.Management.ManagementBaseObject ReconnectParentVirtualHardDisk(System.String ChildPath, System.String ParentPath, System.Boolean Force)

so now we will connect the child to new parent.

$vhd.ReconnectParentVirtualHardDisk($child,$parent,1)

Thursday, April 9, 2009

Creating Differencing VHD using Powershell; read it to the end

Dear my blog-spectateur,

I just would like to highlight, I am not writing this to tell you another way to create another type of VHDs but I am creating this to let you know how to get different methods out of the WMI

Basically as you may know there are different types of VHDs in Microsoft implementation of virtual hard disk

First there is the fixed size where it takes the same amount of physical disk and represent it in your Virtual Machine

2nd they dynamic disk or what they call it dynamically expanding disk where it takes a tinny amount of Disk space just to identify disk properties like the maximum size and then expands by adding additional data to the file.

The 3rd type is the differencing disk where you have a disk either dynamic or fixed used as a parent and another VHD dynamically expands as long as you add additional data to the disk and the parent is used in the read operations. best example like to need to test something to your VM so you can create difference of your parent and then power on the VM using the difference then what ever you add to your machine it will not affect your parent disk.

I have demonstrated in a previous blog how you can create your dynamically expanding disk.

What I am going to do now is to use the Powershell along with the WMI to create Difference disk using the same like the previous blog

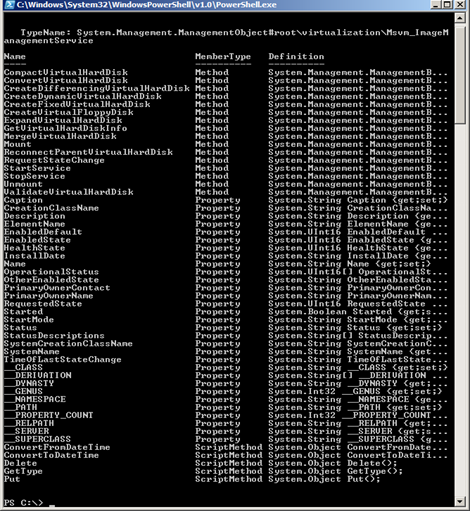
We will search the WMI class for a method to create the dynamic disk we can use a Powershell Command-let called get-member which helps you to get the properties and methods of objects.

so lets try the command now
image

as you see above, it lists all the available data that you can get from this class it list the methods which are commands you can initiate and properties which are the attributes about this class and its instances like caption where is the name of the class.

So we can list the class attributes by just type the command-let without the pipelining

image

this command output is formatted as a list “line per attribute” the way this output is displayed is the the default of the Powershell is to display output using a command format-list or its alias FL

so the command is completed as:

PS C:\> Get-WmiObject Msvm_ImageManagementService - namespace "root\virtualization" -computername . format-list

but if you need to get spacific attributes “properties” you can type format-list -property Caption, InstallDate or you can type the properties directly without typing -property like this

Get-WmiObject Msvm_ImageManagementService -namespace "root\virtualization" -computername . format-list Caption, InstallDate

image

So, I assume we know how to use the properties and how to list it just give a try and use format-wide and format-table instead of format-list.

Lets move to the methods

Methods are are like commandlets available in this class like in here there are a list of methods and we can use the command

get-member –membertype method

image

So, as per the blog topic we need to create Difference disk so we have a method called CreateDifferencingVirtualHardDisk where we will use but the problem is how we should use it, what is the appropriate format.

We will use the command get-member to show only the method we need then we will pipeline it to format-list to display the information clearly

image

In the highlighted section which is Definition you will see the the function, oops I mean the method requires two parameters (1st one is the vhd drive path , then the parent VHD path)

So, lets apply what we have learnt now:

I have a parent disk named W2k3sp2base32.vhd and I would like to create a disk name scomr2.vhd both files are located under C:\Vhds\

So, first to use the method I have to add the class to variable

$vhd=Get-WmiObject Msvm_ImageManagementService -namespace "root\virtualization" -computername .

Then I will call the method from the variable and i will use () included with the parameters needed.

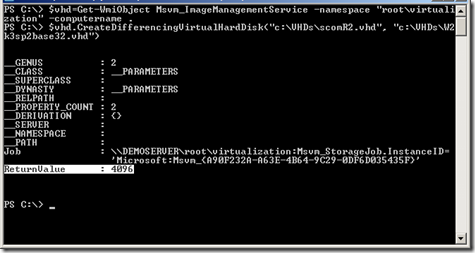
$vhd.CreateDifferencingVirtualHardDisk(“c:\VHDs\scomR2.vhd”, “c:\VHDs\W2k3sp2base32.vhd”)
image

Look at the returned value is 4096 which means Method Parameters Checked – JobStarted. which hopefully means Ok

you can get all the values from http://msdn.microsoft.com/en-us/library/cc136778(VS.85).aspx

I hope this was useful and I hope to get your feed back…

Mahmoud Ibrahim
Senior Consultant Infrastructure Solutions
OMS ME

OMS

Monday, April 6, 2009

How to Mount Disks to your physical Machine using Powershell

1st you have to have HyperV Role installed

define the ImageManagementService Class as Variable

$Disk=Get-WmiObject Msvm_ImageManagementService -namespace "root\virtualization" –computername .

Call mount method which require only the full path for your vhd drive like the example below:

$disk.mount("C:\Program Files\Microsoft Learning\50028B\Drives\50028-DC1-Data.vhd")

once the command succeed you will see like new drive is being installed in your notification area

image

the problem now that the disk is currently offline like the disk 2 in the image below so we have to bring online and then assign Drive letter.

image

we can do this also by Powershell but it is very long I will add it later.

Creating Dynamically Expanded VHD using Powershell

simply you have to have Hyper-V Role installed on the machine where the task will be executed.

start your Powershell Console

set variable as the class we would like to use like the below

$var = commandlet

and as we will use WMI class to deal with the VHD we have to use command called get-wmiobject this allow us to use the Msvm_ImageManagementService from the Virtualization namespace which is located under root\Virtualization and on the local computer by using –computer . or we can replace the . with remote computer name

Get-WmiObject Msvm_ImageManagementService -namespace "root\virtualization" -computername .

so we need to use method named CreateDynamicVirtualHardDisk in Msvm_ImageManagementService class to create our dynamic disk.

Note: to get the methods you can pipeline the command above with get-member command like in the picture below.

image

so to get back on how to execute a method we have to insert our WMI Class in variable by typing

$disk = Get-WmiObject Msvm_ImageManagementService -namespace "root\virtualization" -computername .

then to call the method by typing $var.method()

$disk.CreateDynamicVirtualHardDisk("C:\dynamic.vhd", 20000000000)

and as this method requires two input 1st is the VHD path location and the second is the size in bytes

as in the example the 20000000000 will create 20 GB

now the command should be executed and display

image

if you go and inspect the file using your hyper-v

image

so we have two lines to create the VHD disk

$disk = Get-WmiObject Msvm_ImageManagementService -namespace "root\virtualization" -computername .

$disk.CreateDynamicVirtualHardDisk("C:\dynamic.vhd", 20000000000)

Sunday, March 29, 2009

Just touching Powershell

As you see it is late at night and I am trying to use powershell not only to apply instructions from a guide on how to migrate Exchange 2007 users or how to create connectors using a powershell, but I am trying to have it as a tool for being used as a day to day...
I write this blog article as I feel confident somehow in using powershell as I did some small commands just to refresh my  network card; it is too simple
1st I queried a wmi class for network cards
Get-WmiObject Win32_NetworkAdapterConfiguration
it results a long list of instances and properties


We can modify the system behavior in displaying the class instances to be in tabular format by piping the data to format-table command like this

PS C:\> Get-WmiObject Win32_NetworkAdapterConfiguration |format-table

image

you can define the command as variable then you can call any methods like renew DHCP lease

image

I will describe all what we have done later in a series of powershell

Tuesday, March 3, 2009

List disk free space for disks locally using PowerShell

I was thinking about how to get the free space from all drives using single command.

image