Login with Facebook
Showing posts with label Virtualization. Show all posts

Sunday, November 30, 2014

HP vPV YouTube videos

Virtualization Performance Viewer (vPV) Overview | HP

http://youtu.be/YDb5_bNwhms

HP vPV - Quickly identify performance bottlenecks in virtualized environment

http://youtu.be/fnBK7VMLjd8

HP vPV - One tool; Many environments - Vendor neutral design

http://youtu.be/fu7_Wlq3BdM

HP vPV - Perform rapid triage analysis and troubleshoot problems in virtualized environment using the workbench

http://youtu.be/hSAtSHGUfgY

HP vPV - Advanced performance troubleshooting using Real Time Guest OS Drilldown

http://youtu.be/xnuOb07A3Sk

HP vPV - Discover means to optimize & right size the virtualized environment

http://youtu.be/G56oafzOr9o

HP vPV - VM placement recommendations for new virtual machines

http://youtu.be/0rEKal0H870

HP vPV - Using vPV to resolve performance problems in OpenStack environment

http://youtu.be/Mdne06aABp8

HP vPV - An overview of out-of-the-box reports offered by vPV

http://youtu.be/UCjtSIFshAI

HP vPV - Getting started with vPV

http://youtu.be/wYnmA_DuBKk

HP vPV - Detect and resolve performance anomalies using alerts

http://youtu.be/IMEpeIVaIbg

HP vPV - Capacity planning made easy with utilization forecast

http://youtu.be/wg-_zeKTP6I

HP vPV - Integrated capacity planning and provisioning in virtual datacenters

http://youtu.be/qodmrrKVua8

HP vPV - Improve the operational efficiency of the virtual infrastructure in the cloud      

http://youtu.be/v3MKOiI8B7E

HP vPV - Capacity planning through what-if modelling and analysis          

http://youtu.be/TpCa_K3we6s

image

image

image

Note: All vPV videos are now listed in this YouTube Playlist.

Monday, March 21, 2011

Using VMware vSphere Client to connect to VMware Server

In Jan 2009 I created an article on How to use the Virtual Infrastructure Client to connect to VMware Server 2.0

Today, I hade another challenge where I want to use the latest client tool which is VMware vSphere Client to connect to an VMware Server it will give you the error below

image

image

image


"The required client support files cannot be retrieved from the server"
"The login process will now exit"
"Details: The server could not interpret the client's request. (404 not found)"


Solution was found in this link http://www.linux.com/community/blogs/accessing-vmware-server-2-with-vsphere-client-the-unsupported-way.html and simply download a rar file Here's a link expand the contents in the “Virtual Infrastructure Client” folder in Program files folder and rerun the tool it will work perfectly.


Note: This is not supported by VMware.

Thursday, July 30, 2009

Merge 2GB VMDK files to one single VMDK file

sometimes when we create Virtual machine inside vmware application we might select create the split virtual disk to multiple files in 2 GB files, this is to enhance the copying process and mainly for storing the VM in File systems that does not support creating larger files.

image

If we need to convert it back to be a single file; there is a tool called vmware-vdiskmanager.exe can be used to manipulate virtual disk, this tool can be used to convert theses file to be single file by using the below command.

vmware-vdiskmanager.exe –r thefirstfile.vmdk –t 0 singlefile.vmdk

  • Source file thefirstfile.vmdk is the selected in the image below

image

screenshot of the command:

image

Saturday, May 2, 2009

Converting Windows 7 boot from VHD to be VM under Hyper-V or any Virtualization boots VHD

When you install Windows 7 on your machine but not directly to your hard disk but to a VHD file in your physical disks

I have created article named Boot your physical machine from a VHD file describing the installation process.

In some cases you may want to take this VHD and to make it running inside Virtual Machine in Microsoft Hyper-V or Microsoft Virtual Server.

There is some simple facts you have to know about boot from VHD

    1. The windows is fully installed in the first partition on the VHD.
    2. When your machine restarts the boot files are launched from the physical disk.
    3. Next, the VHD is mounted and an entry in the Boot Configuration Data configuration loads the winload.exe

VM where the VHD is mounted will not boot and it will display the screen below; this means the partitions is not marked as active

image

to make the VM bootable it will take two main steps:

First, step is to make the Partition bootable

Second, we have to install the BCD in the active partition

To complete these steps.

I will boot the VM with Windows 7 DVD.

image

image

image

image

image

Click next to proceed in the repairing process.

image

Click Repair your computer.

image

Press next after finish searching

image

Select Command Prompt

image

image

image

Type in command prompt the following

Diskpart

then select the disk and the windows partition and mark the partition as active

Select disk 0

select partition 1

active

exit

image

image

To restore the boot configuration data type the below commands.

Bootrec.exe /FixMbr

Bootrec.exe /FixBoot

Bootrec.exe /RebuildBcd

the final part is copy the boot manager files to the VHD boot partition.

Change directory to Drive D:\ where the Windows 7 DVD is mounted by type

image

d:

copy bootmgr c:\

copy bootmgr.efi c:\

Now, you can start the VM and it will Windows 7 will boot correctly correctly.

Monday, April 13, 2009

Reconnect VHD Parent Disk

Dear my readers,

As stated in a previous blog, there is three main types of the disks.

the Child and parent disks where you can have some sort of base disk contains all sysprepped image of the windows and another child disk contains the currently running system like base for windows 2003 sp2 and multiple child disks contains different applications

anyway what I am trying to address is when you move your parent files to another directory and try to open the child VHDs in your VMs you will get a message in Virtual PC saying please locate your Parent disks, but if you are using HyperV you will get error message which says you cannot start the machine due to disk failure….

You can use the WMI to connect back your Child disk with the parent in the new location

we will declare variable for the wmi class we working with.

$vhd=gwmi Msvm_ImageManagementService –namespace root\virtualization –comp $computer

we will define the disks as variables

$child=c:\vhds\child.vhd

$parent=c:\vhds\parent.vhd

we will define the computer we are trying to connect to in the $computer variable; if it localhost we will use “.” dot if it is remote we will use the accessible hostname or netbios name.

$computer=.

now it is ready to use our method ReconnectParentVirtualHardDisk which help us the solve the problem stated above, as we learnt before that if we want to know how to use certain method then we use get-member and look for the syntax in the definition

$vhd |gm ReconnectParentVirtualHardDisk |fl

TypeName   : System.Management.ManagementObject#root\virtualization\Msvm_ImageManagementService
Name       : ReconnectParentVirtualHardDisk
MemberType : Method
Definition : System.Management.ManagementBaseObject ReconnectParentVirtualHardDisk(System.String ChildPath, System.String ParentPath, System.Boolean Force)

so now we will connect the child to new parent.

$vhd.ReconnectParentVirtualHardDisk($child,$parent,1)

Thursday, April 9, 2009

Creating Differencing VHD using Powershell; read it to the end

Dear my blog-spectateur,

I just would like to highlight, I am not writing this to tell you another way to create another type of VHDs but I am creating this to let you know how to get different methods out of the WMI

Basically as you may know there are different types of VHDs in Microsoft implementation of virtual hard disk

First there is the fixed size where it takes the same amount of physical disk and represent it in your Virtual Machine

2nd they dynamic disk or what they call it dynamically expanding disk where it takes a tinny amount of Disk space just to identify disk properties like the maximum size and then expands by adding additional data to the file.

The 3rd type is the differencing disk where you have a disk either dynamic or fixed used as a parent and another VHD dynamically expands as long as you add additional data to the disk and the parent is used in the read operations. best example like to need to test something to your VM so you can create difference of your parent and then power on the VM using the difference then what ever you add to your machine it will not affect your parent disk.

I have demonstrated in a previous blog how you can create your dynamically expanding disk.

What I am going to do now is to use the Powershell along with the WMI to create Difference disk using the same like the previous blog

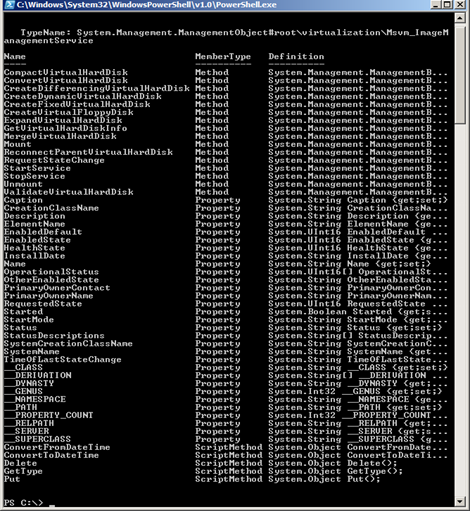
We will search the WMI class for a method to create the dynamic disk we can use a Powershell Command-let called get-member which helps you to get the properties and methods of objects.

so lets try the command now
image

as you see above, it lists all the available data that you can get from this class it list the methods which are commands you can initiate and properties which are the attributes about this class and its instances like caption where is the name of the class.

So we can list the class attributes by just type the command-let without the pipelining

image

this command output is formatted as a list “line per attribute” the way this output is displayed is the the default of the Powershell is to display output using a command format-list or its alias FL

so the command is completed as:

PS C:\> Get-WmiObject Msvm_ImageManagementService - namespace "root\virtualization" -computername . format-list

but if you need to get spacific attributes “properties” you can type format-list -property Caption, InstallDate or you can type the properties directly without typing -property like this

Get-WmiObject Msvm_ImageManagementService -namespace "root\virtualization" -computername . format-list Caption, InstallDate

image

So, I assume we know how to use the properties and how to list it just give a try and use format-wide and format-table instead of format-list.

Lets move to the methods

Methods are are like commandlets available in this class like in here there are a list of methods and we can use the command

get-member –membertype method

image

So, as per the blog topic we need to create Difference disk so we have a method called CreateDifferencingVirtualHardDisk where we will use but the problem is how we should use it, what is the appropriate format.

We will use the command get-member to show only the method we need then we will pipeline it to format-list to display the information clearly

image

In the highlighted section which is Definition you will see the the function, oops I mean the method requires two parameters (1st one is the vhd drive path , then the parent VHD path)

So, lets apply what we have learnt now:

I have a parent disk named W2k3sp2base32.vhd and I would like to create a disk name scomr2.vhd both files are located under C:\Vhds\

So, first to use the method I have to add the class to variable

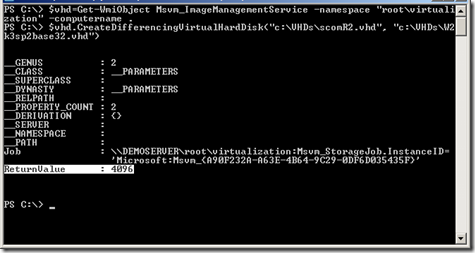
$vhd=Get-WmiObject Msvm_ImageManagementService -namespace "root\virtualization" -computername .

Then I will call the method from the variable and i will use () included with the parameters needed.

$vhd.CreateDifferencingVirtualHardDisk(“c:\VHDs\scomR2.vhd”, “c:\VHDs\W2k3sp2base32.vhd”)
image

Look at the returned value is 4096 which means Method Parameters Checked – JobStarted. which hopefully means Ok

you can get all the values from http://msdn.microsoft.com/en-us/library/cc136778(VS.85).aspx

I hope this was useful and I hope to get your feed back…

Mahmoud Ibrahim
Senior Consultant Infrastructure Solutions
OMS ME

OMS

Monday, April 6, 2009

How to Mount Disks to your physical Machine using Powershell

1st you have to have HyperV Role installed

define the ImageManagementService Class as Variable

$Disk=Get-WmiObject Msvm_ImageManagementService -namespace "root\virtualization" –computername .

Call mount method which require only the full path for your vhd drive like the example below:

$disk.mount("C:\Program Files\Microsoft Learning\50028B\Drives\50028-DC1-Data.vhd")

once the command succeed you will see like new drive is being installed in your notification area

image

the problem now that the disk is currently offline like the disk 2 in the image below so we have to bring online and then assign Drive letter.

image

we can do this also by Powershell but it is very long I will add it later.

Creating Dynamically Expanded VHD using Powershell

simply you have to have Hyper-V Role installed on the machine where the task will be executed.

start your Powershell Console

set variable as the class we would like to use like the below

$var = commandlet

and as we will use WMI class to deal with the VHD we have to use command called get-wmiobject this allow us to use the Msvm_ImageManagementService from the Virtualization namespace which is located under root\Virtualization and on the local computer by using –computer . or we can replace the . with remote computer name

Get-WmiObject Msvm_ImageManagementService -namespace "root\virtualization" -computername .

so we need to use method named CreateDynamicVirtualHardDisk in Msvm_ImageManagementService class to create our dynamic disk.

Note: to get the methods you can pipeline the command above with get-member command like in the picture below.

image

so to get back on how to execute a method we have to insert our WMI Class in variable by typing

$disk = Get-WmiObject Msvm_ImageManagementService -namespace "root\virtualization" -computername .

then to call the method by typing $var.method()

$disk.CreateDynamicVirtualHardDisk("C:\dynamic.vhd", 20000000000)

and as this method requires two input 1st is the VHD path location and the second is the size in bytes

as in the example the 20000000000 will create 20 GB

now the command should be executed and display

image

if you go and inspect the file using your hyper-v

image

so we have two lines to create the VHD disk

$disk = Get-WmiObject Msvm_ImageManagementService -namespace "root\virtualization" -computername .

$disk.CreateDynamicVirtualHardDisk("C:\dynamic.vhd", 20000000000)

Saturday, April 4, 2009

Adding Microsoft Loopback Adapter in Windows 7 and Windows 2008 R2

I have tried to install Ms Loopback adapter to Windows 2008 R2

I used the normal method which is open Control Panel and select Add a device link and actually it did not list the device like previous versions.

I found the solution is very easy all you have to do is to launch the old add hardware wizard hdwwiz.exe and do the same steps like the previous versions.

Start by press Start button or Windows button depend on your GUI then type hdwwiz.exe then right click it and choose run as Administrator to ensure that the process will succeed

image

Press next to continue to the next page

image

Select the the second option to ensure that you will be able to identify your card.

image

Select Network Adapters.

image

Select Microsoft from Manufactures list then select Microsoft Loopback Adapter

image

image

image

image

now you have an new adapter as loopback

image

Friday, March 27, 2009

Using VMRC Plus to manage your Microsoft Virtual Server

In one of my previous blogs it was about how to access VMware Server using a GUI and today I am presenting a nice tool if you want to manage your MS Virtual Server using GUI; this tool is VMRC Plus it is enhanced version of VMRC Client but the VMRC Client is used only to connect to your VMs without giving you access to configure your host server( adding VM, create disks, create networks …. )

this tool is downloadable though this link https://www.microsoft.com/downloads/details.aspx?FamilyID=80ADC08C-BFC6-4C3A-B4F1-772F550AE791&displaylang=en

it requires that your Virtual server to be Virtual Server 2005 R2 SP1

once you launch the tool you will get the application window which allow you to connect to the desired Virtual Server by name or IP

image

Once you are connected you will get a list of your VMs and their status, you can start stop save  modify configuration as below.

image

if you would like to see the VM you can choose VM Console from the context menu or from the icons on the right

image

image

You can modify settings like add disk, NIC or even change VM name.

image

when you select the memory input box you will get information about the maximum allowed based on the system you are connecting to.

image

if you would like to see the Windows Event logs related to Virtual Server it self you can launch Event Viewer from tools

image

image

to create disks you can use tools –> create Disk

image

You will get window like the below

imageyou have to write the name of the file in the input field and then it allows create button to be activated.


image