Login with Facebook

Thursday, May 17, 2012

Enable root access to SSH sessions in Solaris

When  Solaris 10 or 11 is installed, by default root can not login from remote machine but normal users can login and can choose to switch to admin using su or sudo.

Root users remote access is disabled on the SSH daemon SSHD level, so simple modify sshd_config file located in /etc/ssh/sshd_config

Locate a line with PermitRootLogin no and replace it with  PermitRootLogin yes

Then restart SSHD by the command below

#svcadm restart svc:/network/ssh:default

Now: you can access Solaris system with root account remotely

Wednesday, March 7, 2012

HP iLO for iPhone and iPad

HP® iLO Mobile Toolbox provides access to the console of your HP ProLiant® server from your iPhone or iPad. Since it interacts directly with the HP Integrated Lights-Out (HP iLO) chip on ProLiant servers, this mobile app gives you total control over your server at all times. It can be healthy or it can be off with a blank hard-drive. Your server only needs to be plugged in. As an IT administrator you can now fix problems and do deployments while you are on the road from almost anywhere.

iPhone Screenshot 1

Besides what remote desktop applications normally do, this app will also allow you to do the following:

  • Operate the server’s power switch
  • View and interact with the server’s startup.
  • Make BIOS configuration changes.
  • Make option ROM configuration changes.
  • Interact with the operating system as it starts.
  • Install an operating system
  • View what is on the screen if the operating system crashes

iLO Mobile Toolbox also allows to you to mount an ISO CD/DVD image via HP iLO. This ISO will show up on the server as a USB CD/DVD drive. You can boot off of it and deploy an operating system.

iPad Screenshot 3

iLO Mobile Toolbox allows you to launch HP iLO scripts and monitor progress. The scripts are staged on your web server and downloaded into this mobile app as they are run.

http://itunes.apple.com/gb/app/hp-ilo-mobile-toolbox/id497560256?mt=8&ign-mpt=uo%3D2

Wednesday, February 15, 2012

Wednesday, December 14, 2011

CommandView 10.0 Knowledge Nuggets


Tips for installing the new 10.0 release of P6000 Command View.


Tips for configuring the new security certificate for CV 10.0


An overview of the new "Management Group" structure in CV 10.0


An overview of the changes to the CV 10.0 user interface


Description of the array types supported by CV 10.0 and and overview of the changes related to the EVA rebranding.

Sunday, November 27, 2011

Installing Siebel on Windows 2000/2003

I have experienced some difficulties install Siebel on Windows platform, I started by trying the installation on Windows 2008 where I saw several articles confirm the supportability of this OS.

I all my trials has failed successfully :) the failure is because many reasons

The installation process itself is complicated (

1- Download Sources.

2- Extract Sources

3- Compiling the extracted sources into Executable

4- Installing the Siebel Components

5- Configure Siebel Components.

Actually, what makes the process complicated is not the number of the steps, the problem is it seems that the Java application used are not compatible with the latest OSs; although it works but if there is missing files, it never complains, it continue peacefully without telling you about it, and you stuck in other stages.

So, the best thing your can say here “if you start correctly, you will end successfully”, that’s the reason I am posting this, so start by 1st process and ensure it is successful by downloading the correct sources even though you have a limited connection and it may take days to download (19 GBytes for Siebel 8.0.0 and 13 Gbytes for Siebel 8.1.1).


So here is the list of files you (have to) download in case you want to have normal (not selective) deployment.

For Siebel 8.0.0 those are the files I have downloaded and lead to successful deployment.

Size in bytes File name

  655,344,135
  664,584,455
  716,652,161
  731,983,848
  725,785,207
   30,004,714
1,592,671,498
1,231,929,449
2,014,455,643
  795,822,527
1,360,026,964
1,974,946,963
  127,754,088
        2,419
1,927,686,037
2,060,206,829
2,072,311,848
   85,212,689
  629,577,634
1,244,487,377
  127,754,088

B34835-01_2of7.zip
B34835-01_3of7.zip
B34835-01_4of7.zip
B34835-01_5of7.zip
B34835-01_6of7.zip
B34835-01_7of7.zip
V15220-01_1of2.zip
V15220-01_2of2.zip
V19057-01_1of2.zip
V19057-01_2of2.zip
V26484-01_1of3.zip
V26484-01_2of3.zip
V26484-01_3of3.zip
V26878-01_1of5.zip
V26878-01_2of5.zip
V26878-01_3of5.zip
V26878-01_4of5.zip
V26878-01_5of5.zip
V28335-01_1of3.zip
V28335-01_2of3.zip
V28335-01_3of3.zip

For Siebel 8.1.1 those are the files I have downloaded and lead to successful deployment.

Size in bytes File name

  426,190,173
2,014,241,964
  629,687,302
  235,999,603
      400,038
2,034,890,082
  654,673,089
    7,228,961
1,317,587,591
  999,535,671
1,941,657,790
  463,619,271
  157,113,508
2,040,719,833
  335,868,918
  223,669,805

V14474-01.zip
V14496-01_1of2.zip
V14496-01_2of2.zip
V14513-01.zip
V14590-01.zip
V14869-01_1of2.zip
V14869-01_2of2.zip
V14959-01.zip
V15040-01_1of2.zip
V15040-01_2of2.zip
V15391-01.zip
V15464-01.zip
V24702-01.zip
V26510-01_1of2.zip
V26510-01_2of2.zip
V26511-01.zip

Monday, August 22, 2011

HP uCMDB: Creating New CIs using Enrichment Rules

In this article, I have used one of the HP uCMDB features to create additional CIs based on the discovered data on certain CI

Scenario:

Operators want to display Operating System name as CI linked with Node CI

Steps:

1-Create New CIT for the Operating System

2-Create relation between Operating System CIT an d Node CIT

3- Create Correlation Rule

3a- in Query Mode adding your Searching criteria  TQL

3b- in Enrichment Mode add the CIT you want to create

3c- Add  Query Node Definition (How the new CI Attributes will be populated)

4- Create Scheduler task to run the Enrichment Rule


1-Create New CIT for the Operating System

Under Modeling > CI Type Manager right click the CIT tree and create a new CIT

I recommend to create the CIT under NodeElement CIT to inherit all the relations and configurations as all NodeElement child CITs

Note: Remove ABSTRACT_CLASS from Type Qualifiers to be able to create CIs


image

2-Create relation between Operating System CIT an d Node CIT

Select Node CIT and OS CIT and right click select Add/remove Relationship.


image

3- Create Correlation Rule

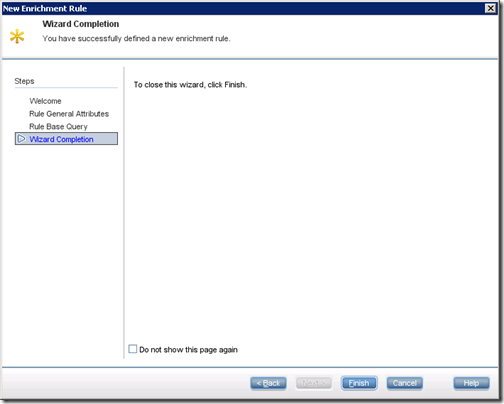
Move to Modeling > Enrichment manager and create new rule


image


image

image

image

3a- in Query Mode adding your Searching criteria  TQL

In Query mode

image

image

I will Edit the Query Node Properties and filter my TQL

I will select DiscoverOSName is Not Null to ensure that this will apply to only nodes that Has this attribute populated

image


3b- in Enrichment Mode add the CIT you want to create

Change the Operations to Enrichment Mode and add the operating System CIT, and Add the relation between Node CIT and Operating System CIT


image

3c- Add  Query Node Definition (How the new CI Attributes will be populated)

Fill the Operating System attributes as needed.

for Name attribute use the option By Attribute and select Node CIT and DiscoveredOsName


image

Note: You may create combination of Node attributes as a value by choosing Advanced


image

4- Create Scheduler task to run the Enrichment Rule


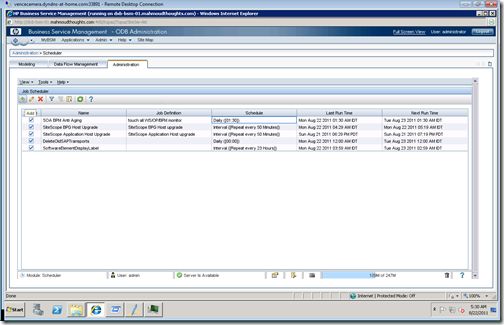
Go to Administration >  Scheduler

Create New Schedule
image

Add Run an Enrichment Rule

image

Select your schedule

image

Run the schedule


The Outcome will be like this, create a view to with Node and OS CITs to get the result.

image