Login with Facebook

Saturday, February 6, 2010

Using HP CAE to collect user information Part 1

You can use HP Client Automation Enterprise to local user accounts information and to be displayed as part of the built-in reports in HP Reporting Manager.

You can assign WBEM_USER_GROUP “WBEM Scan for User/Group “ under Audit domain to computer or OU to get this data collected.

Then notify computers for Audit

Install HP Performance Manager license

To install license to OVPM you can use the steps below

cd %ovinstalldir%\bin

ovpm license

image

a new text window is open for controlling license and you will get message like license expired

type gui to launch Autopass for OVPM

Select Install/restore License

Click Browse to locate the license file

Click view content

Click Install

image

Close the application

in the text program type status to get the current status.

image

now you can log to system normally

Friday, February 5, 2010

How to use WBEMTEST to get WMI data level 1

Launch wbemtest from command prompet or RUN
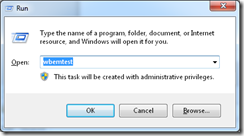
image

Here is the interface

image

to locate WMI classes attributes or instances you have to connect with account with sufficient privilege (note: all users has privilege to WMI but depend of type of action you want to execute which may require administrator priv.)

press on connect then type which namespace you want to connect to: by default Windows (Win32_*)built-in classes almost located under root\cimv2 then click connect.

This will connect you with the current user account, you may specify another account to gain more privilege

image

This is the screen after connection.

image

If you know certain class you can click on Open Class

If you do not know and you want to search manually you may click Enum Classes

To get all the classes you may select Recursive and press OK

image

A full list of classes will be displayed as below

image

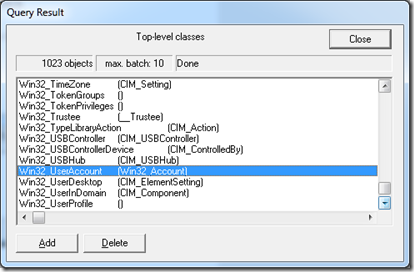
Browse to any class and double click

for example User Account on the local machine are under Win32_UserAccount class
 image

Click on Instances to list all the instances

image

Here is the list of User Account

image


To be continued.

please remind me to continue it.

Wednesday, January 27, 2010

VERITAS Cluster Service Quick reference

This quick reference give you a quick view about the commands that you can use to deal with Veritas Cluster Service using different commands like hagrp, hares, haagent and hauser

Basic VCS Commands
SERVICE GROUPS AND RESOURCE OPERATIONS
BASIC CONFIGURATION OPERATIONS
STATUS AND VERIFICATION
COMMUNICATION
ADMINISTERATION

http://eval.veritas.com/downloads/van/vcs_quickref.pdf

Saturday, November 21, 2009

رحمك الله يا الامام الشافعي


رحمك الله يالامام الشافعي

أحـب الصالحيـن ولسـت منهـم

لعلـي أن أنـال بـهـم شفـاعـة

وأكـره مـن تجارتـه المعاصـي

ولـو كنـا سـواء فـي البضاعـة

يخاطبنـي السفيـه بكـل قـبـح

فأكـره أكــون لــه مجيـبـا

يزيـد سفاهـة فـأزيـد حلـمـا

كعـود زاده الإحـراق طيـبـا

شكوت إلى وكيـع سـؤ حفظـي

فأرشدني إلـى تـرك المعاصـي

وأخبرنـي بـأن العـلـم نــور

ونـور الله لا يـهـدى لعـاصـي

علـي ثيـاب لـو يبـاع جميعهـا

بفلس لكان الفلس منهـن أكثـرا

وفيهن نفس لـو تقـاس ببعضهـا

نفوس الورى كانت أجل وأكبرا

وما ضـر السيـف إغـلاق غمـده

إذا كان عضبا أين ما وجهته فرى

نعيـب زماننـا والعيـب فيـنـا

ومـال زماننـا عـيـب سـوانـا

ونهجو ذا الزمـان بغيـر ذنـب

ولـو نطـق الزمـان لنـا هجانـا

وليس الذئب يأكـل لحـم ذئـب

ويأكـل بعضنـا بـعـض عيـانـا

تموت الأسد في الغابـات جوعـا

ولحـم الضـأن تأكلـه الـكـلاب

وعبـد قـد ينـام علـى حـريـر

وذو نسـب مفارشـه الـتـراب

الدهر يومان ذا أمن وذا خطـر

والعيش عيشان ذا صفو وذا كدر

أما ترى البحر تعلو فوقـه جيـف

وتستقـر بأقصـى قاعـه الـدرر

وفي السماء نجـوم لا عـداد لهـا

وليس يكسف إلا الشمـس والقمـر

أخي لـن تنـال العلـم إلا بستـة

سأنبيـك عـن تفصيلهـا ببـيـان

ذكاء وحـرص واجتهـاد وبلغـة

وصحبـة أستـاذ وطـول زمــان

قالو سكت وقد خوصمت قلت لهم

إن الجواب لبـاب الشـر مفتـاح

والصمت عن جاهل أو أحمق شرفا

وفيه أيضا لصون العـرض إصـلاح

أما ترى الأسد تخشى وهي صامتة

والكلب يخسى لعمري وهو نبـاح

وعيناك إن أبدت إليـك مسـاؤا

فدعها وقل يا عين للنـاس أعيـن

فلا ينطقن منـك اللسـان بسـوءة

فكلـك سـوءات وللنـاس ألسـن

وعاشر بمعروف وسامح من اعتدى

ودافع ولكن بالتي هـي أحسـن

Wednesday, November 18, 2009

Allow OVPI to send emails through Exchange 2007

Remember one thing that there is two tasks you should do

1- create Receive Connector to accept OVPI connection

2-PowerShell Command to assign Permission for anonymous to relay from OVPI

To troubleshoot this  Create dummy schedule and run the reports inside and you can open %dpipe_home%\log\piweb.log

If you got  Unable to relay

image

To use the Exchange Management Console to create a new Receive connector that grants the relay permission to anonymous connections

  1. Open the Exchange Management Console. Perform one of the following steps:

    1. To create a Receive connector on a computer that has the Edge Transport server role installed, select Edge Transport, and then in the work pane, click the Receive Connectors tab.
    2. To create a Receive connector on a Hub Transport server role, in the console tree, expand Server Configuration, and select Hub Transport. In the result pane, select the server on which you want to create the connector, and then click the Receive Connectors tab.
  2. In the action pane, click New Receive Connector. The New SMTP Receive Connector wizard starts.

  3. On the Introduction page, follow these steps:

    1. In the Name: field, type a meaningful name for this connector. This name is used to identify the connector.
    2. In the Select the intended use for this connector: field, select Custom.
    3. Click Next.
  4. On the Local network settings page, follow these steps:

    1. Select the existing All Available entry, and then click Remove icon.
    2. Click Add. In the Add Receive Connector Binding dialog box, select Specify an IP address. Type an IP address that is assigned to a network adapter on the local server that is best able to communicate with the remote messaging server.

Note: In simple exchange implementation, you can leave it as default.

    1. On the Local network settings page, in the Port field, type 25, and then click OK.
    2. Click Next.
  1. On the Remote Network settings page, follow these steps:

    1. Select the existing 0.0.0.0 - 255.255.255.255 entry, and then click Remove icon.
    2. Click Add or the drop-down arrow located next to Add and type the IP address or IP address range for the remote messaging server or servers that are allowed to relay mail on this server. When you are finished entering the IP addresses, click OK.
    3. Click Next.
  2. On the New Connector page, review the configuration summary for the connector. If you want to modify the settings, click Back. To create the Receive connector by using the settings in the configuration summary, click New.

  3. On the Completion page, click Finish.

In the work pane, select the Receive connector that you created.

  • Under the name of the Receive connector in the action pane, click Properties to open the Properties page.

  • Click the Permission Groups tab. Select Anonymous users.

  • Click OK to save your changes and exit the Properties page

Open the Exchange Management Shell.

  • Run the following command using the name of the Receive connector that you created in steps 1 through 11:

    Get-ReceiveConnector "Receive Connector Name" | Add-ADPermission -User "NT AUTHORITY\ANONYMOUS LOGON" -ExtendedRights "Ms-Exch-SMTP-Accept-Any-Recipient"


image 


to list the Receive Connector Name you can type Get-ReceiveConnector

Tuesday, November 10, 2009

Load MIB file in NNMi

to load mib file in NNMi

change to OV_bin dir

/opt/OV/bin

nnmincidentcfg.ovpl –u username –p password –loadMib <mib file location>

nnmloadmib.ovpl –u system –p password -resynch

image